Login with Paysera
Paysera offers a secure API that lets your customers sign in to your web site using their Paysera account. Signing in with Paysera is quick, fast and convenient way for people to log into your web site. Customer just need to have Paysera account, log in with his credentials and confirm allowances.
Use Cases
- Login with Paysera lets people quickly and easily create an account in your web site without having to set a password or fill other registration form fields. You will be able to obtain user data which is confirmed by our system.
- Login with Paysera lets people quickly and easily sign in to your web site with the same data they are using in Paysera. You don’t have to save data about user in your system.
Benefits
Real identity. When people choose to login with Paysera, they share their real identity. It includes a person's real name, their gender and their locale, phone. Websites based on real identity often have less spam.
Automatic customers account data updates. You will get up to date data from us, which might be renewed in our system.
Permissions selection. You may allow user to control what info they want to share with you. You may allow customer to connect with basic permissions and if they want to use your extended services asks them to give more permissions.
Integration
Before using API, you must register in Paysera system. Public registration is not yet available, please contact our support to register the client for this API. You will be provided with your credentials, for example:
client_id:     wkVd93h2uS
mac_key:       IrdTc8uQodU7PRpLzzLTW6wqZAO6tAMU
mac_algorithm: hmac-sha-256
mac_key must be kept secret at all times.
At each request to API the client must construct an authentication header by calculating the UNIX
timestamp and generating a random string used as a nonce. From these values, together
with the HTTP request method, request URI, hostname, port and mac_key, the client has to calculate hash
using the algorithm defined by mac_algorithm. This calculated hash is mac value, which
must be included in the authorization header. More info: Wallet API.
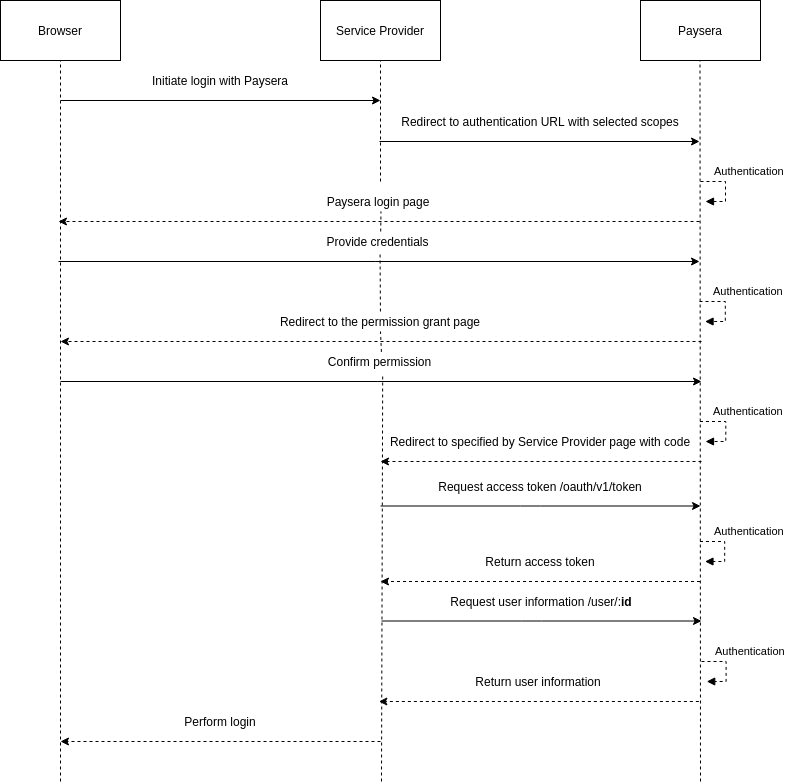
Login with Paysera always consists of four steps that take place each time a customer logs in with Paysera from the merchant's web site:
-
Customer gets redirected to authentication endpoint. You must provide
client_idandredirect_url; -
After user authenticates in the Paysera system, he is redirected to provided redirection URI together
with parameter
code; -
Client makes API request to the token endpoint providing the
codeparameter. Response containsaccess_tokenandmac_key; -
Client makes API requests, using
access_tokenandmac_keyinstead of default credentials for MAC authentication scheme.
Integration with the library
You can integrate Login with Paysera into your website by downloading our open source software library. The library is used to check all the necessary security parameters of transferred and received data. PHP library is available on GitHub, together with more information about installing and using it. Please feel free to fork and make pull requests for added functionality or fixed bugs. More info: Wallet libraries.
Below you will find a working example. Locations where your Paysera access data has to be entered are marked with comments.
1. Create a folder.
Create a folder, name it paysera-wallet. Here, all the files related to Login with Paysera will be stored.
2. Download the library.
3. Create a file that will get user info.
Create file login-with-paysera.php
in the paysera-wallet folder. First of all you must include library and register
GatewayClient_Autoloader as an SPL autoloader:
<?php
if (!class_exists('Paysera_WalletApi_Autoloader')) {
    require_once 'lib-wallet-php-client-master/src/Paysera/WalletApi/Autoloader.php';
}

Paysera_WalletApi_Autoloader::register();
Write in your authentication data values, which you have received as Wallet credentials:
// $clientId - mac
$clientId = 'wkVd93h2uS';
// $secret - mac_key
$secret = 'IrdTc8uQodU7PRpLzzLTW6wqZAO6tAMU';
Create main object to use for all functionality and get service, responsible for OAuth code grant type integration. Using our library you may create object either for production, either for testing – Sandbox:
$api = new Paysera_WalletApi($clientId, $secret);
$oauth = $api->oauthConsumer();
Sandbox
$api = new Paysera_WalletApi($clientId, $secret, Paysera_WalletApi_Util_Router::createForSandbox());
$oauth = $api->oauthConsumer();
Currently two grant types are available:
- authorization code grant - used on web systems, recommended method;
- resource owner password credentials grant - used on mobile and desktop programs, only allowed for specific clients.
In this example authorization code grant method is used. More info: Using OAuth
Start new session as we will store token object in $_SESSION['token']:
session_start();
To facilitate the catching of potential exceptions code must be surrounded in try block:
try {

// Login with Paysera steps

} catch (Exception $e) {
    echo '<pre>', $e, '</pre>';
}
Inside try block there will be logic which will ask and get information. First step is to redirect user to authentication endpoint, then redirect user back to client's site and request access token, more information about those steps: Using OAuth.
In this example we are going to obtain information about user email, so we will use
SCOPE_EMAIL. Scopes define what information can be requested from the API or what
actions performed. More info about scopes:
Available scopes.
if (!isset($_SESSION['token'])) {
    $token = $oauth->getOAuthAccessToken();
    if ($token === null) {
        $redirectUri = null;
        header('Location: ' . $oauth->getAuthorizationUri(array(
                Paysera_WalletApi_OAuth_Consumer::SCOPE_EMAIL,
                ), $redirectUri));
    } else {
        $_SESSION['token'] = $token;
    }
}
To get user information we are using me as id of the user, as we have received access token.
More info about getting users information: User Resource.
In the example we are saving new $_SESSION['token'] as it can be refreshed. Unique user id
from Paysera system is saved in $userID, email address of the user is saved in
$userEmail. It can be used for logging in or as registration field to web site:
if (isset($_SESSION['token'])) {
    $tokenRelatedClient = $api->walletClientWithToken($_SESSION['token']);
    $user = $tokenRelatedClient→getUser();
    $userID= $user->getId();
    $userEmail = $user->getEmail();
    $_SESSION['token'] = $tokenRelatedClient->getCurrentAccessToken();
}
The whole code in the file login-with-paysera.php:
<?php
if (!class_exists('Paysera_WalletApi_Autoloader')) {
    require_once 'lib-wallet-php-client-master/src/Paysera/WalletApi/Autoloader.php';
}

Paysera_WalletApi_Autoloader::register();

// $clientId - mac
$clientId = 'wkVd93h2uS';
// $secret - mac_key
$secret = 'IrdTc8uQodU7PRpLzzLTW6wqZAO6tAMU';

$api = new Paysera_WalletApi($clientId, $secret, Paysera_WalletApi_Util_Router::createForSandbox());
$oauth = $api->oauthConsumer();

session_start();
try {
    if (!isset($_SESSION['token'])) {
        $token = $oauth->getOAuthAccessToken();
        if ($token === null) {
            $redirectUri = null;
            header('Location: ' . $oauth->getAuthorizationUri(array(
                    Paysera_WalletApi_OAuth_Consumer::SCOPE_EMAIL,
                ), $redirectUri));
        } else {
            $_SESSION['token'] = $token;
        }
    }

    if (isset($_SESSION['token'])) {
        $tokenRelatedClient = $api->walletClientWithToken($_SESSION['token']);
        $user = $tokenRelatedClient->getUser();
        $userID= $user->getId();
        $userEmail = $user->getEmail();
        $_SESSION['token'] = $tokenRelatedClient->getCurrentAccessToken();
    }
} catch (Exception $e) {
    echo '<pre>', $e, '</pre>';
}
Integration with the specification
If it's available (there is PHP with required version in your server), we strongly advise to use our library.
Currently two grant types are available:
- authorization code grant - used on web systems, recommended method;
- resource owner password credentials grant - used on mobile and desktop programs, only allowed for specific clients.
We will use authorization code grant method in this example. More info: Using OAuth.
1. Redirecting user to authentication endpoint.
User must be redirected to the following URI, providing required parameters in query:
https://www.paysera.com/frontend/oauth
Together with URI some query parameters must be provided:
response_type, client_id.
Together with URI some query parameters can be provided:
redirect_uri, scope, state.
Example redirection URI:
https://www.paysera.com/frontend/oauth?response_type=code&client_id=wkVd93h2uS&redirect_uri=http%3A%2F%2Flocalhost%2Fabc&state=iQZMRnQCtm
2. Redirecting back to client's site.
After user authorizes project, he will be redirected to the provided redirection_uri.
code and state (if it was provided) parameters will be sent together with the URI.
For example:
HTTP/1.1 302 Found
Location: http://localhost/abc?code=SplxlOBeZQQYbYS6WxSbIA&state=iQZMRnQCtm
3. Requesting access token.
Token endpoint:
https://wallet.paysera.com/oauth/v1/token
After confirming the state parameter, you can request access token by providing code parameter.
POST request must be made to the token endpoint by adding the following parameters using the
application/x-www-form-urlencoded format in the HTTP request body:
grant_type, code, redirect_uri.
API request must be authenticated using one of available methods, like in any other API request. For example:
POST /oauth/v1/token HTTP/1.1
Host: wallet.paysera.com
Content-Type: application/x-www-form-urlencoded;charset=utf-8
User-Agent: Paysera WalletApi PHP library
Authorization: MAC id="wkVd93h2uS", ts="1343811600", nonce="nQnNaSNyubfPErjRO55yaaEYo9YZfKHN", mac="ElTV7TYXQrZrBe0tL6PtqvH6EI15iBSd/JvAkpMoH64=", ext="body_hash=IftzxAtYliLQx46c2JAPidlHKqck0OXD7KmsHNnSptU%3D"
grant_type=authorization_code&code=SplxlOBeZQQYbYS6WxSbIA&redirect_uri=http%3A%2F%2Flocalhost%2Fabc
Response contains new credentials to use for API calls, related to the current user and wallet:
access_token, token_type, expires_in, mac_key,
mac_algorithm, refresh_token. For example:
For example:
HTTP/1.1 200 OK
Content-Type: application/json;charset=UTF-8
Cache-Control: no-store
Pragma: no-cache
{
    "access_token": "SlAV32hkKG",
    "token_type": "mac",
    "expires_in": 3600,
    "mac_key": "adijq39jdlaska9asud",
    "mac_algorithm": "hmac-sha-256",
    "refresh_token": "0UnzbsnOLSkC7ftN"
}
4. Requesting user by ID.
GET https://wallet.paysera.com/rest/v1/user/:id
For example:
GET /rest/v1/user/221/identity HTTP/1.1
Host: wallet.paysera.com
User-Agent: Paysera WalletApi PHP library
Authorization: MAC id="wkVd93h2uS", ts="1343811600", nonce="nQnNaSNyubfPErjRO55yaaEYo9YZfKHN", mac="a/a7ZtHbFEuSWowd+7+A3t5tlWnQk7SNLrQlETn5i5w="
Response:
HTTP/1.1 200 OK
Content-type: application/json;charset=utf-8
{
    "name": "John",
    "surname": "Smith",
    "nationality": "lt",
    "code": "31001010000"
}
Login with Paysera button
Javascript SDK is available for better integration with Paysera system - this library can be used independently on language used on back-end. This library does not provide any way to call API methods themselves.
To use OAuth, additional script page is always required to pass and check for correct parameters.
To open OAuth dialog, use WebToPayWallet.openDialog function with URI to your OAuth script.
The script should redirect user to authentication page on Paysera system. When user is redirected back
to your site, page should retrieve access_token and pass message to the parent window
from pop-up or lightbox.
 Login with Paysera
<script src="[PATH_TO_PAYSERA_JS_LIB]"></script>
<script>
    WebToPayWallet.init({
        'client_id': '[YOUR_CLIENT_ID]',
        'language': 'en'
    });
</script>

<style>#loginWithPayseraBtn{color:white;font-size:17px;text-decoration:none;font-family:Open Sans,Helvetica Neue,Helvetica,Arial,sans-serif;background:#136c9c;border-radius:3px;padding:11px 24px 14px 10px;cursor:pointer;} #loginWithPayseraBtn img.loginWithPayseraBtnLogo{padding:3px 8px 3px 0px;border-right:1px solid #417b9a;vertical-align:middle;} #loginWithPayseraBtn span.loginWithPayseraBtnText{padding-left:16px;vertical-align:middle;}</style>
<span onclick="WebToPayWallet.openDialog('[PATH_TO_OAUTH_SCRIPT]')" id="loginWithPayseraBtn">
    <img class="loginWithPayseraBtnLogo"
         src="https://static.paysera.com/assets/image/donate-button/paysera-sign-v1.png" />
    <span class="loginWithPayseraBtnText">Login with Paysera</span>
</span>