Getting Started with Paysera Tickets
Complete step-by-step guide to creating your first event with Paysera Tickets, whether it's free or paid.
For Free Events
Distribute free event tickets at absolutely no cost!
Step 1: Access Paysera Tickets
- Navigate to tickets.paysera.com
- Click Event Management
- Sign in using one of these options:
- Facebook account
- Google account
- Paysera account
For free events, you don't need a Paysera bank account - just use social login!
Step 2: Create Your Event
Fill in the event details:
Basic Information:
- Event name - Clear, descriptive title
- Description - What attendees can expect
- Category - Concert, conference, sports, etc.
- Event image - High-quality promotional image
Date & Location:
- Start date and time
- End date and time (if applicable)
- Venue name
- Address
- City and country
Tickets:
- Ticket types - Create different categories (VIP, Regular, Student)
- Ticket quantities - Set limits for each type
- Mark all as FREE - Set price to €0.00
Step 3: Configure Settings
Additional Options:
- Registration form (collect attendee info)
- Event visibility (public/private)
- Ticket transfer settings
- Social media sharing options
Step 4: Publish Your Event
- Review all information
- Click Save and Publish
- Your event is now live!
Step 5: Share Your Event
Share the event link:
https://tickets.paysera.com/event/your-event-id
Promotion options:
- Share on social media
- Email to contacts
- Embed on your website
- Add to event calendars
📹 Watch Tutorial: Creating Free Events
For Paid Events
Sell tickets and collect payments in real-time.
Prerequisites
Before creating paid events, you need:
✅ Paysera bank account
✅ Verified identity
✅ Checkout project configured
✅ Domain(s) approved (for website integration)
Step 1: Open Paysera Account
If you don't have a Paysera account yet:
1. Register:
- Go to bank.paysera.com/registration
- Fill in personal/company information
- Accept terms and conditions
- Submit registration
2. Verify Identity:
- Upload required documents
- Complete verification process
- Wait for approval (usually 1-2 business days)
3. Access Your Account:
- Log in to your Paysera account
- Explore dashboard features
📹 Watch Tutorial: Opening Paysera Account
Step 2: Create Checkout Project
Set up payment collection infrastructure:
1. Navigate to Payment Gateway:
- Log into your Paysera account
- Go to Payment Gateway section
- Click Projects
2. Create New Project:
- Click New Project
- Fill in project details:
- Project name (e.g., "My Events Ticketing")
- Description
- Contact email
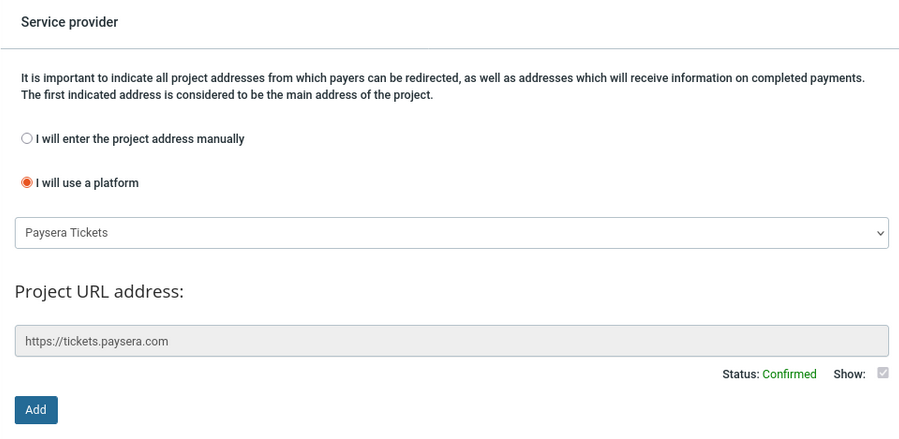
3. Select Service Provider:
- Above Project URL address, select checkbox "I will use a platform" (This will hardcode the Paysera Tickets domain for your project)
4. Configure Payment Methods:
Select which payment methods to accept:
Bank Transfers:
- SEB
- Swedbank
- Luminor
- Revolut
- Other banks
Cards:
- Visa
- Mastercard
- Maestro
International:
- Trustly
- PayPal
- Other systems
5. Review Fee Structure:
- Understand transaction fees
- Choose pricing tier based on volume
📹 Watch Tutorial: Setting Up Checkout
Step 3: Configure Domain Settings
Critical Step: Add your website domain(s) to approved list
Why This Matters:
- Security measure to prevent unauthorized usage
- Required for website integration
- Validates ticket purchases
How to Configure:
-
Access Checkout Settings:
- Open your Checkout project
- Navigate to Settings → Configuration
- Find Allowed Domains section
-
Add Domains:
example.com
www.example.com
tickets.example.com -
Important Rules:
- Add each variant separately (www and non-www)
- Add all subdomains you'll use
- Use exact domain format (no http://)
- Allow 5 minutes for changes to propagate
Without adding your domain to the approved list, ticket sales on your website will fail with a domain error!
Example Configuration:
✅ mydomain.com
✅ www.mydomain.com
✅ tickets.mydomain.com
✅ events.mydomain.com
Step 4: Create Paid Event
Now you're ready to create your ticketed event:
1. Access Paysera Tickets:
- Go to tickets.paysera.com
- Sign in with your Paysera account
- Click Event Management
2. Create New Event:
Basic Information:
- Event name
- Description (support markdown)
- Category
- Featured image (recommended: 1200x630px)
Schedule:
- Event date and time
- Doors open time
- Event duration
- Time zone
Location:
- Venue name
- Full address
- Map coordinates (optional)
- Parking information (optional)
3. Configure Tickets:
Create ticket types with prices:
VIP Tickets:
- Price: €50.00
- Quantity: 100
- Description: "Front row access, meet & greet"

Regular Tickets:
- Price: €25.00
- Quantity: 500
- Description: "General admission"

Student Tickets:
- Price: €15.00
- Quantity: 100
- Description: "Valid student ID required"
4. Link Checkout Project:
- Select your Checkout project
- Verify payment methods
- Configure commission settings
5. Set Ticket Options:
- Sale start date/time
- Sale end date/time
- Minimum/maximum per order
- Ticket transfer settings
6. Additional Settings:
- Registration form fields
- Terms and conditions
- Refund policy
- Age restrictions
Step 5: Test Before Launch
Test Purchase Flow:
- Create test event (mark as draft)
- Add test tickets
- Make test purchase
- Verify email notifications
- Check ticket appearance
- Test QR code scanning
Always test the complete purchase flow before making event public!
Step 6: Publish and Promote
1. Final Review:
- Check all information for accuracy
- Verify ticket prices
- Test on mobile devices
- Review registration form
2. Publish Event:
- Change status from Draft to Published
- Event goes live immediately
- Start accepting ticket sales
3. Promotion:
- Share event link
- Social media campaigns
- Email marketing
- Partner websites
- Paid advertising
Common Mistakes to Avoid
❌ Forgetting Domain Configuration
Problem: Ticket purchases fail on your website
Solution: Add domain to Checkout project before launch
❌ Wrong Event Time
Problem: Attendees arrive at wrong time
Solution: Double-check time zone and use 24-hour format
❌ Insufficient Testing
Problem: Issues discovered after launch
Solution: Complete test purchase before making event public
❌ Missing Registration Form
Problem: Can't contact ticket buyers
Solution: Add email field to registration form
❌ No Refund Policy
Problem: Customer disputes
Solution: Set clear refund policy before selling tickets
Next Steps
Now that you've created your event:
- Explore Features → - Add seat selection, discounts, etc.
- Get Support → - Find answers and get help
Need Help?
Stuck during setup? We're here to help!
- 📧 Email: support@paysera.com
- 📞 Phone: Contact Information
- 📚 Help Center: support.paysera.com