PSD2 Integration
How to Start?
In order to start using PSD2 integration with Paysera you should follow this steps:
- Read the documentation;
- Contact Paysera to be able use the service (read the Authentication chapter);
- Prepare integration following the documentation.
The Flow
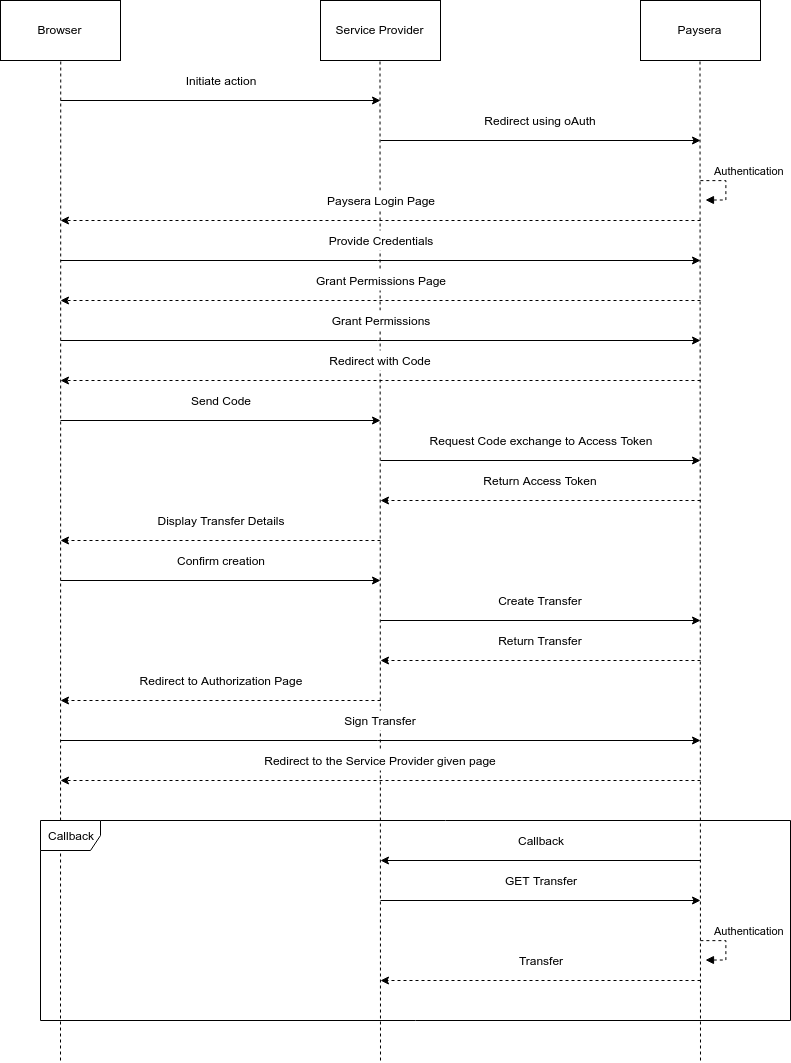
In order to use PSD2 integration between Merchant and Paysera some steps must be completed. To understand which actions must be made between Customer, Merchant and Paysera check the integration sequence diagram below:
Payment initiation
If payment is initiated when there is no information about the exact payer account, then this flow should be used:

Note: to initiate the transfer, permissions must be granted. To get this permission
initiate_transfers scope should be used. More information about obtaining permissions:
Getting User's Information.
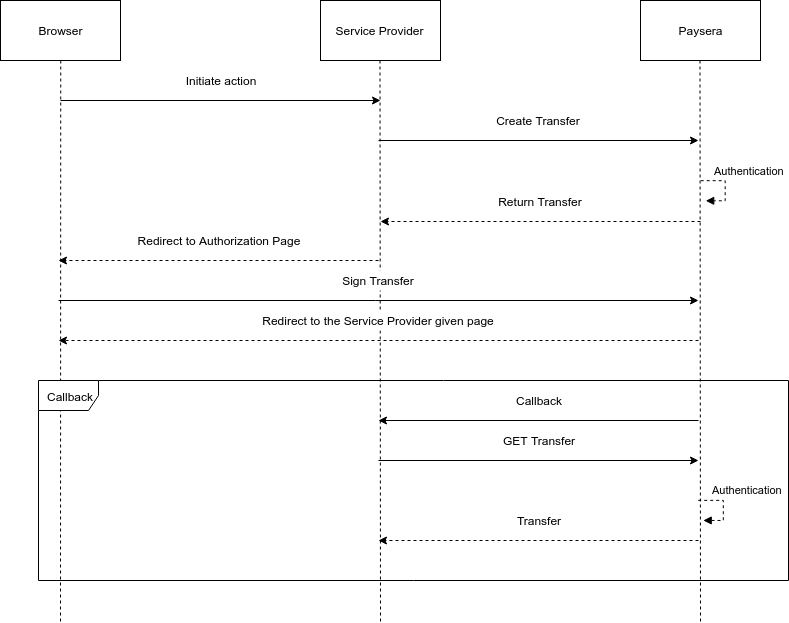
Payment initiation with a specific account
If payment is initiated when there is exact information about payer account, then this flow should be used:

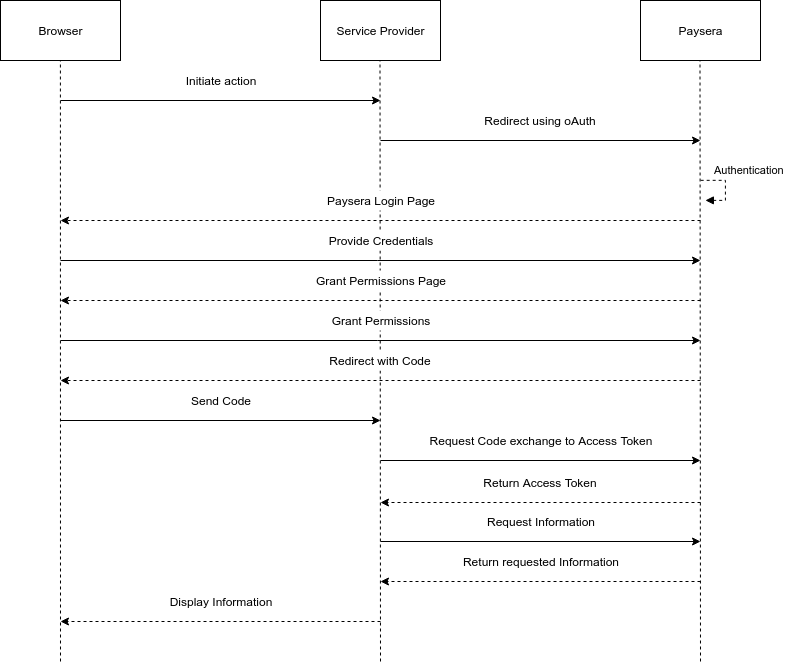
Gathering account information
To collect information about Paysera user account it's required to obtain such permissions from the user. An integration scheme below should be used:

Note: to access user's information. permissions must be granted. It can be done by using specific scopes. More information about obtaining permissions: Getting User's Information. Scopes which could be used in Open Banking to obtain information about user wallet:
-
check_has_sufficient_balance- Get if user has enough money in balance. -
balance- Get balance of user's wallet. -
statements- Get account statements related to user's wallet.
More information about Wallet related requests: Wallet Resources.
Authentication
Authentication is performed by using the QWAC certificate. Before using it, the owner of the client provides a QWAC certificate for Paysera administrators. Paysera will allow the clients to use QWAC provided and grant permissions to access specific information. You may find Paysera contacts at the bottom of the page.
Specification
To obtain information about user account in Paysera system you need to use oAuth, read more info about this: Getting User's Information.
To obtain information about the user's wallet resources walletId - me must be used,
as access token is used. More information about obtaining wallet resources:
Wallet Resources.
To obtain information about the user you should request for information. It's possible to request specific information about the user. More info: User resource.
To create a transfer or check the status of the created transfer there must be initiated a request to the Paysera system. Read more info about the requests and responses between the systems: PSD2 API Specifications.
If the request is initiated by the Payment Service User (PSU), the Third Party Providers (TPP) should include the Paysera-User-Ip parameter (the IP Address where the PSU is connected to the TPP) in the headers. In this scenario, there will be no restrictions.
To include the Paysera-User-Ip parameter in your API requests, it should be added to the header of these requests made to the Paysera system
GET /wallet/{walletId}/receipt/balance HTTP/1.1
Host: {environment}.paysera.com
Content-Type: application/json;charset=utf-8
Paysera-User-Ip: {user_ip_here}
GET /wallet/{walletId}/statements HTTP/1.1
Host: {environment}.paysera.com
Content-Type: application/json;charset=utf-8
Paysera-User-Ip: {user_ip_here}
In case you want User to confirm already created transfer, please use the following endpoint. User will be redirected to the transfer sign page, to authenticate the transfer.
https://bank.paysera.com/frontend/wallet/transfer-sign/:transferId
URI parameters:
-
transferId- id of the transfer, which is obtained after creating a transfer.
Query parameters:
redirect_uri- website address where should be returned user after confirming the transfer.
